Growth & Marketing AI
Tracking Who's Visiting Your Site
Result:
Every pageview on your site lands in your tracking tool within minutes of a real deploy, and the tracking script itself is absent from any build that hasn't been handed a live key, so dev and untested previews never inflate your real numbers.
Part of a series: this is the foundation for the repo-route dashboard and identifying readers on form submission, both of which need real events flowing first.
Shortcut
Paste this into Claude Code, pointed at your own site’s repo, once you have the key below.
Requires manual input
A PostHog account, project, and Project API key, plus pasting that key into your host’s build-time environment variables (Cloudflare Workers, in this case). All of it happens inside accounts only you can log into. Steps 1, 2, and 8 below cover where to click.
Wire PostHog into my site, gated behind a build-time environment variable
so it's absent from local dev and any build without a real key:

1. Install posthog-js.
2. In my site's shared layout <head>, initialize PostHog only when
   [my chosen variable name, e.g. PUBLIC_POSTHOG_KEY] is set, using
   person_profiles: 'identified_only'.
3. Add that variable name to .env.example with no real value.
4. Confirm npm run build with the variable unset produces a build with no
posthog string anywhere in the output.Problem#
Any system that reasons about your site, an attribution model, a growth dashboard, even a simple check on whether a change helped, needs one input underneath it: real traffic data. How many people showed up, when, and from where. Without it, every downstream claim about growth or performance is an assertion, not a result.
Traffic volume is also one of the first signals marketers check when judging a site’s health: whether a given day had real visitors, whether a change in copy or design moved anything at all. Before any of that can be measured, something has to be recording it.
PostHog is one way to do that: a single script tracks pageviews, clicks, and session data, with a free tier generous enough for most personal or early-stage sites. Google Analytics is another, and probably the most widely used option overall; a separate recipe covers setting that up, along with how the two differ on identity resolution. Either way, the setup problem is the same: you want tracking running on your real, deployed site, but not in local development, not in every throwaway preview build, and not in a way that assumes a server you may not have.
Pattern#
This is the general shape, whichever tool you pick. The specifics below follow PostHog, since that’s the one wired up on this site.
- Create an account with your tracking tool. Sign up for PostHog’s free tier (1M events/month), or Google Analytics, and create a project or property scoped to your domain.
- Copy your project’s key. PostHog calls it a “Project API key,” under Settings, then “Project API key.” Google Analytics calls its equivalent a “Measurement ID.” Hold onto it; it doesn’t go in your code yet.
- Install the tracking library. For PostHog:
npm install posthog-js. Most tools ship a small package like this one. - Initialize it from your site’s shared layout, gated behind an environment variable. In
whatever file renders your
<head>on every page, add the tool’s init call, but only run it when a specific environment variable is set. That keeps the script out of local development and out of any build that hasn’t been handed a real key. - Name that variable something a reader of your code will understand, not a name borrowed from
someone else’s project. The convention depends on your framework: Astro and Vite use a
PUBLIC_prefix (for example,PUBLIC_ANALYTICS_KEY), Next.js usesNEXT_PUBLIC_(for example,NEXT_PUBLIC_ANALYTICS_KEY), and a plain Node server can use whatever you’d like, since nothing there is automatically exposed to the browser. Pick one name and use it consistently, in your code and in your host’s dashboard. - If your project isn’t on GitHub yet, start there. Create a free account at github.com,
then click “New repository” and give it a name. From your project’s folder on your computer,
run
git init,git add ., andgit commit -m "Initial commit". GitHub’s own new-repository page shows the exact two commands to run next to connect and push it: one to add the repo as a remote, one to push your code up. - Connect that GitHub repository to your hosting provider. In Cloudflare’s dashboard
(Vercel’s and Netlify’s work the same way, with different screens), find the option to import
or connect a Git repository, authorize access to your GitHub account, and select the repo. This
is what makes a future
git pushtrigger a real deploy. - Set your environment variable in the host’s dashboard, not in your code. Find your host’s build-time environment variables screen. On Cloudflare, that’s nested inside the Worker’s Settings, under Build, a different panel from the top-level “Variables and secrets” section, which only applies at request time. Add the name you chose in step 5, and paste in the key from step 2 as the value.
- Trigger a fresh build. Push a commit, or use your host’s “retry build” or “redeploy” option. A build that already ran before you saved the variable won’t pick it up after the fact; it needs a new one.
- Confirm a real event lands before trusting anything downstream of it. Visit your live site, then check your tracking tool’s dashboard (PostHog calls this the “Activity” view) for a real pageview. Only once you see one is the pipeline working.
Step by step, screenshots included, with the debugging detour
The pattern above is the idealized shape of it. Here’s what happened wiring
exitvelocities.com up to a real PostHog project, including two wrong turns.
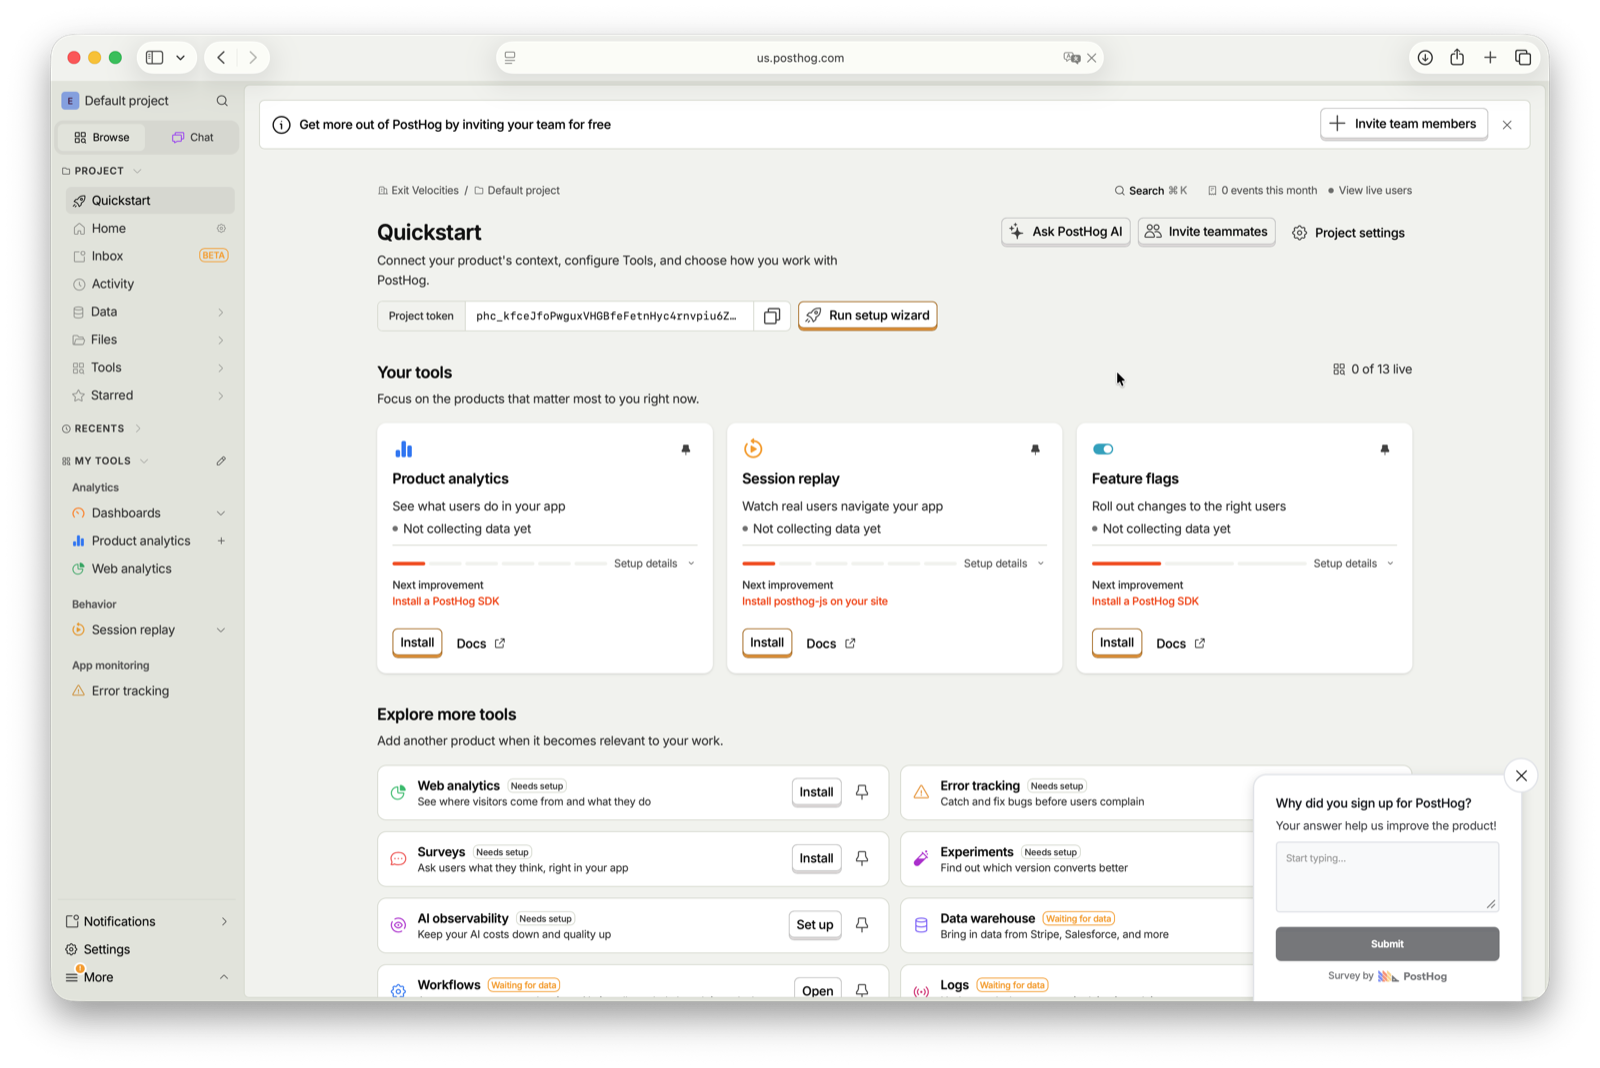
1. Create the PostHog project#
PostHog’s Quickstart screen after creating an “Exit Velocities” project. Every tool (“Product analytics,” “Session replay,” “Feature flags”) still reads “Not collecting data yet,” and the project token is right there to copy.
2. Find the build-time variables panel, not the runtime one#
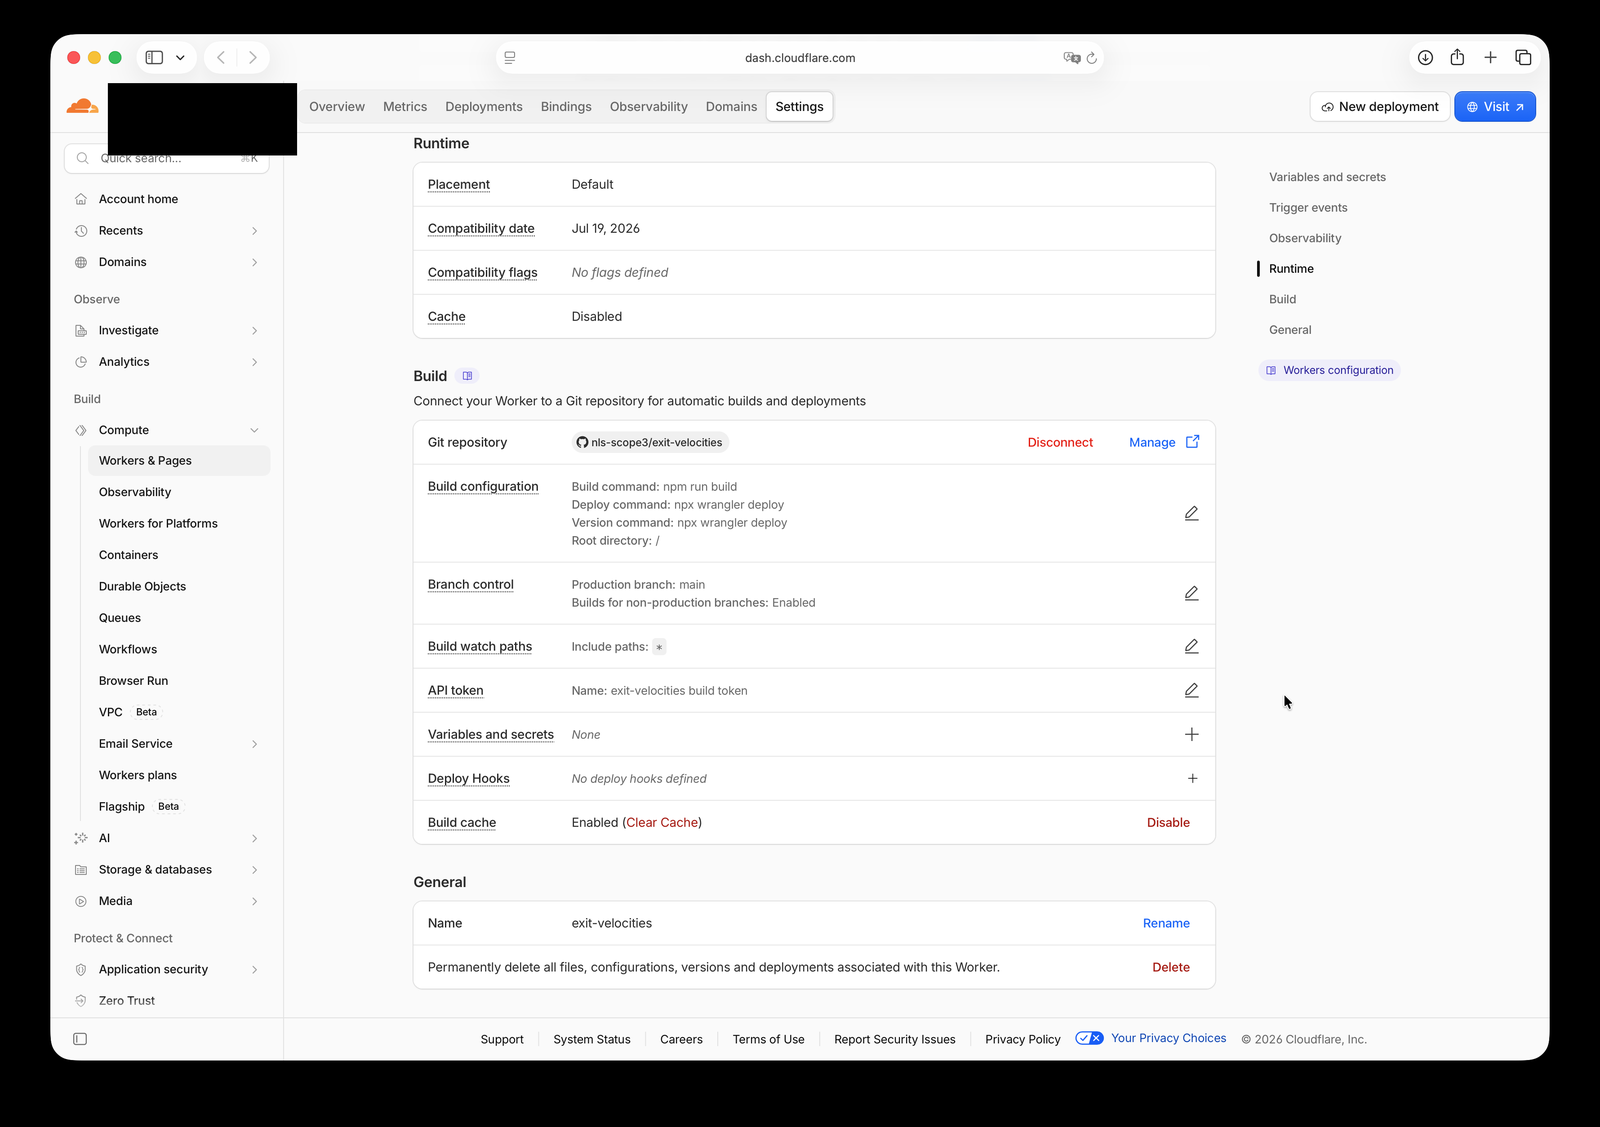
Cloudflare’s Worker Settings page has a “Variables and secrets” panel right at the top, but for a
static-assets Worker like this one, it’s disabled (“Variables cannot be added to a Worker that
only has static assets”), because that panel is for runtime variables a Worker script reads
per-request. The one that matters is further down, inside the Build card, since your
tracking key needs to exist while astro build runs, not at request time.
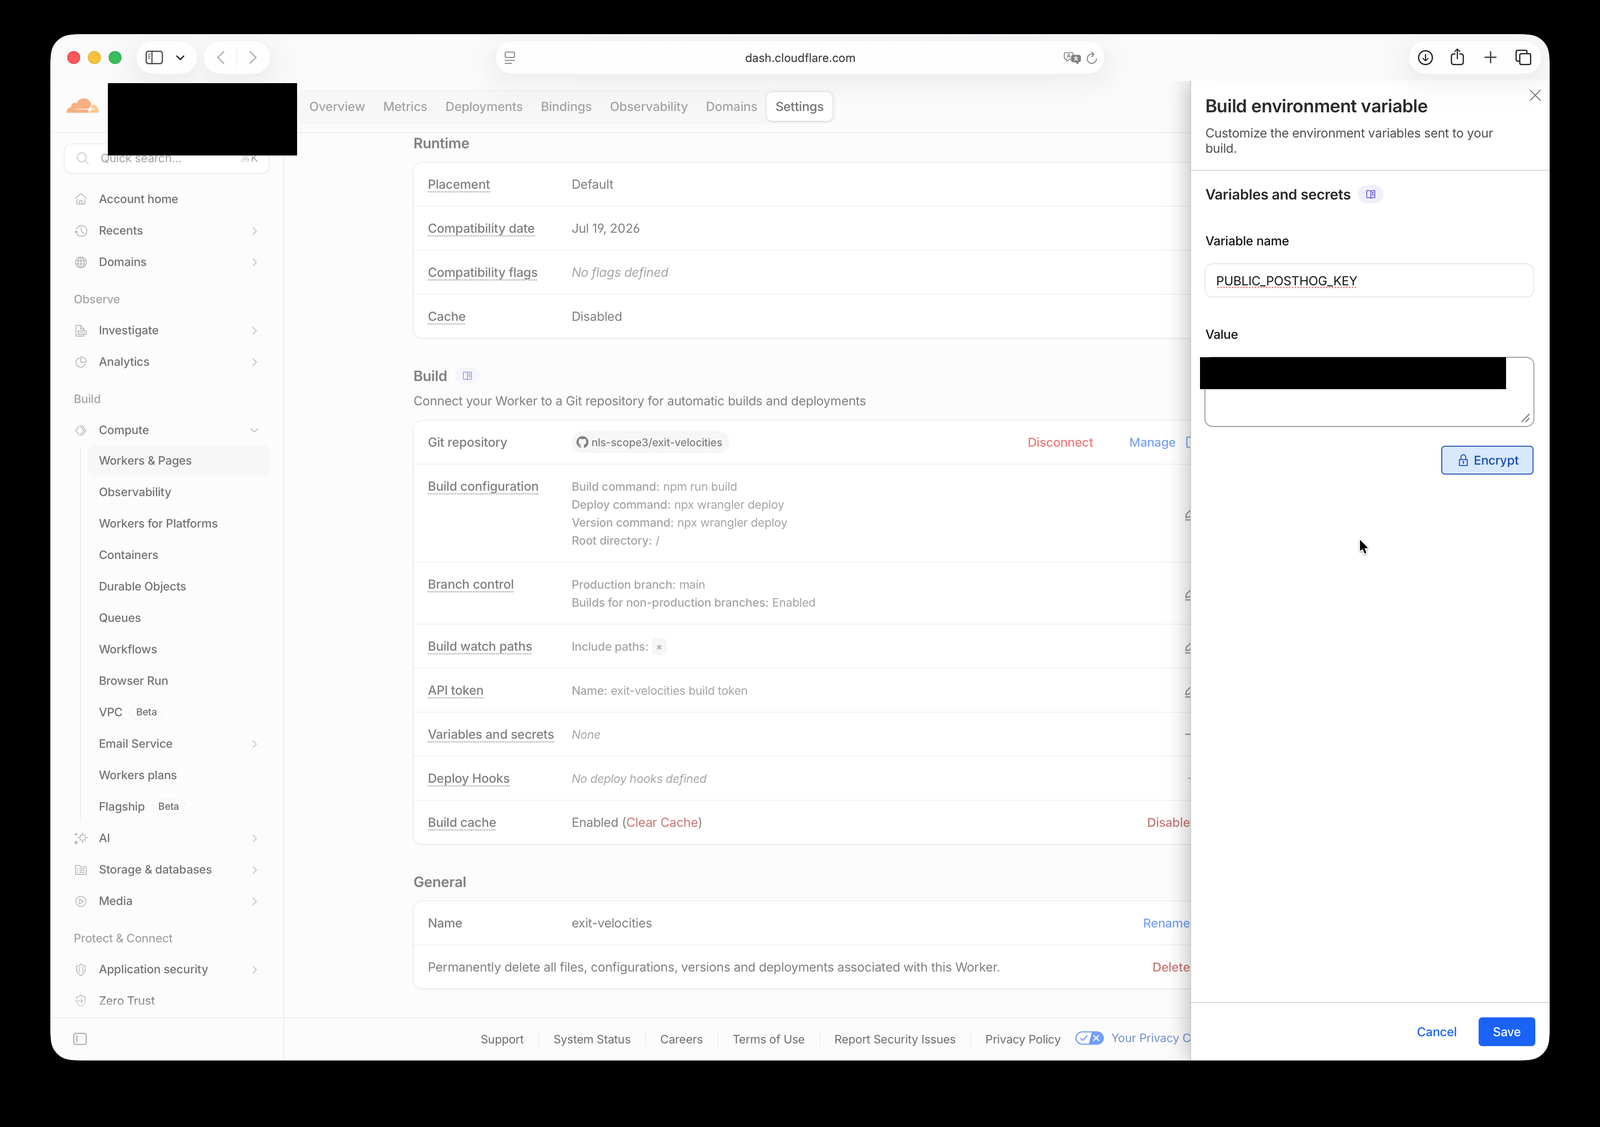
3. Enter the key#
The variable name chosen in the Pattern above, and the project token from step 1, as the value.
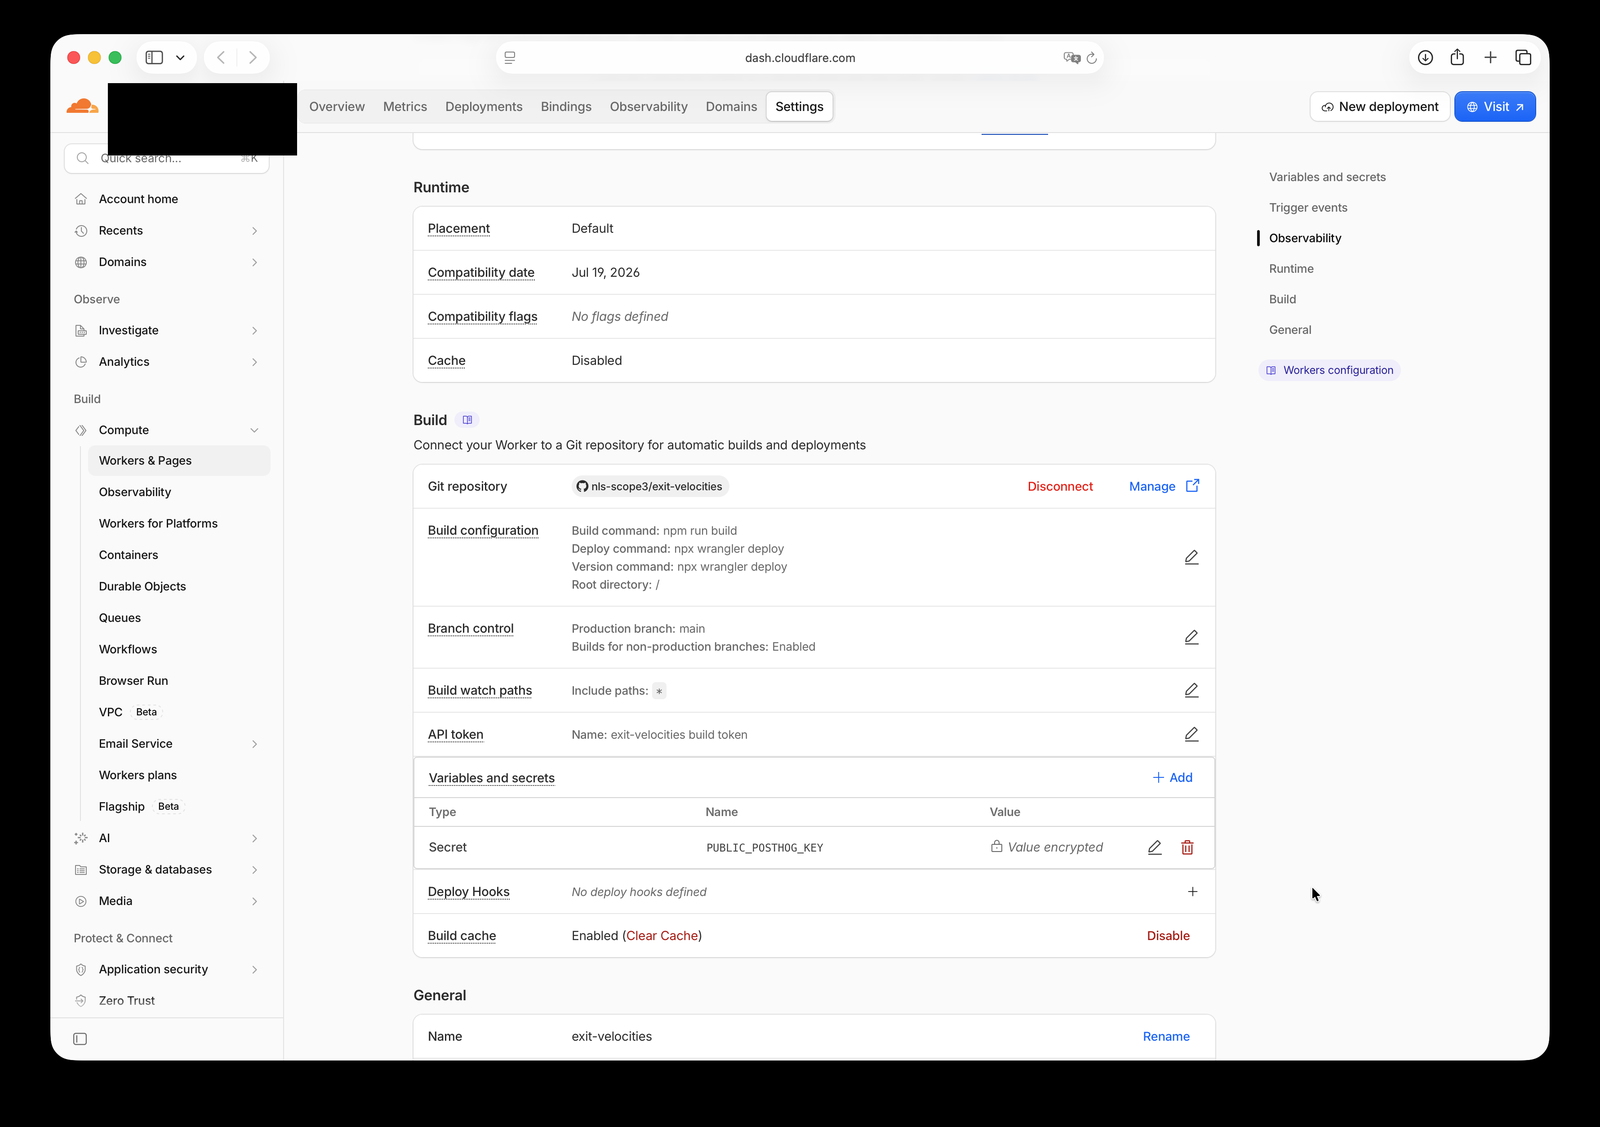
4. Saved, and the first wrong turn#
Clicking Encrypt before saving turns it into a Secret-type variable, masked afterward. The
instinct at the time was that Secret-type build variables might only be injected into the Worker’s
runtime, not exposed to the npm run build step. That was plausible, but wrong. It works the
same as a plaintext variable once a build picks it up.
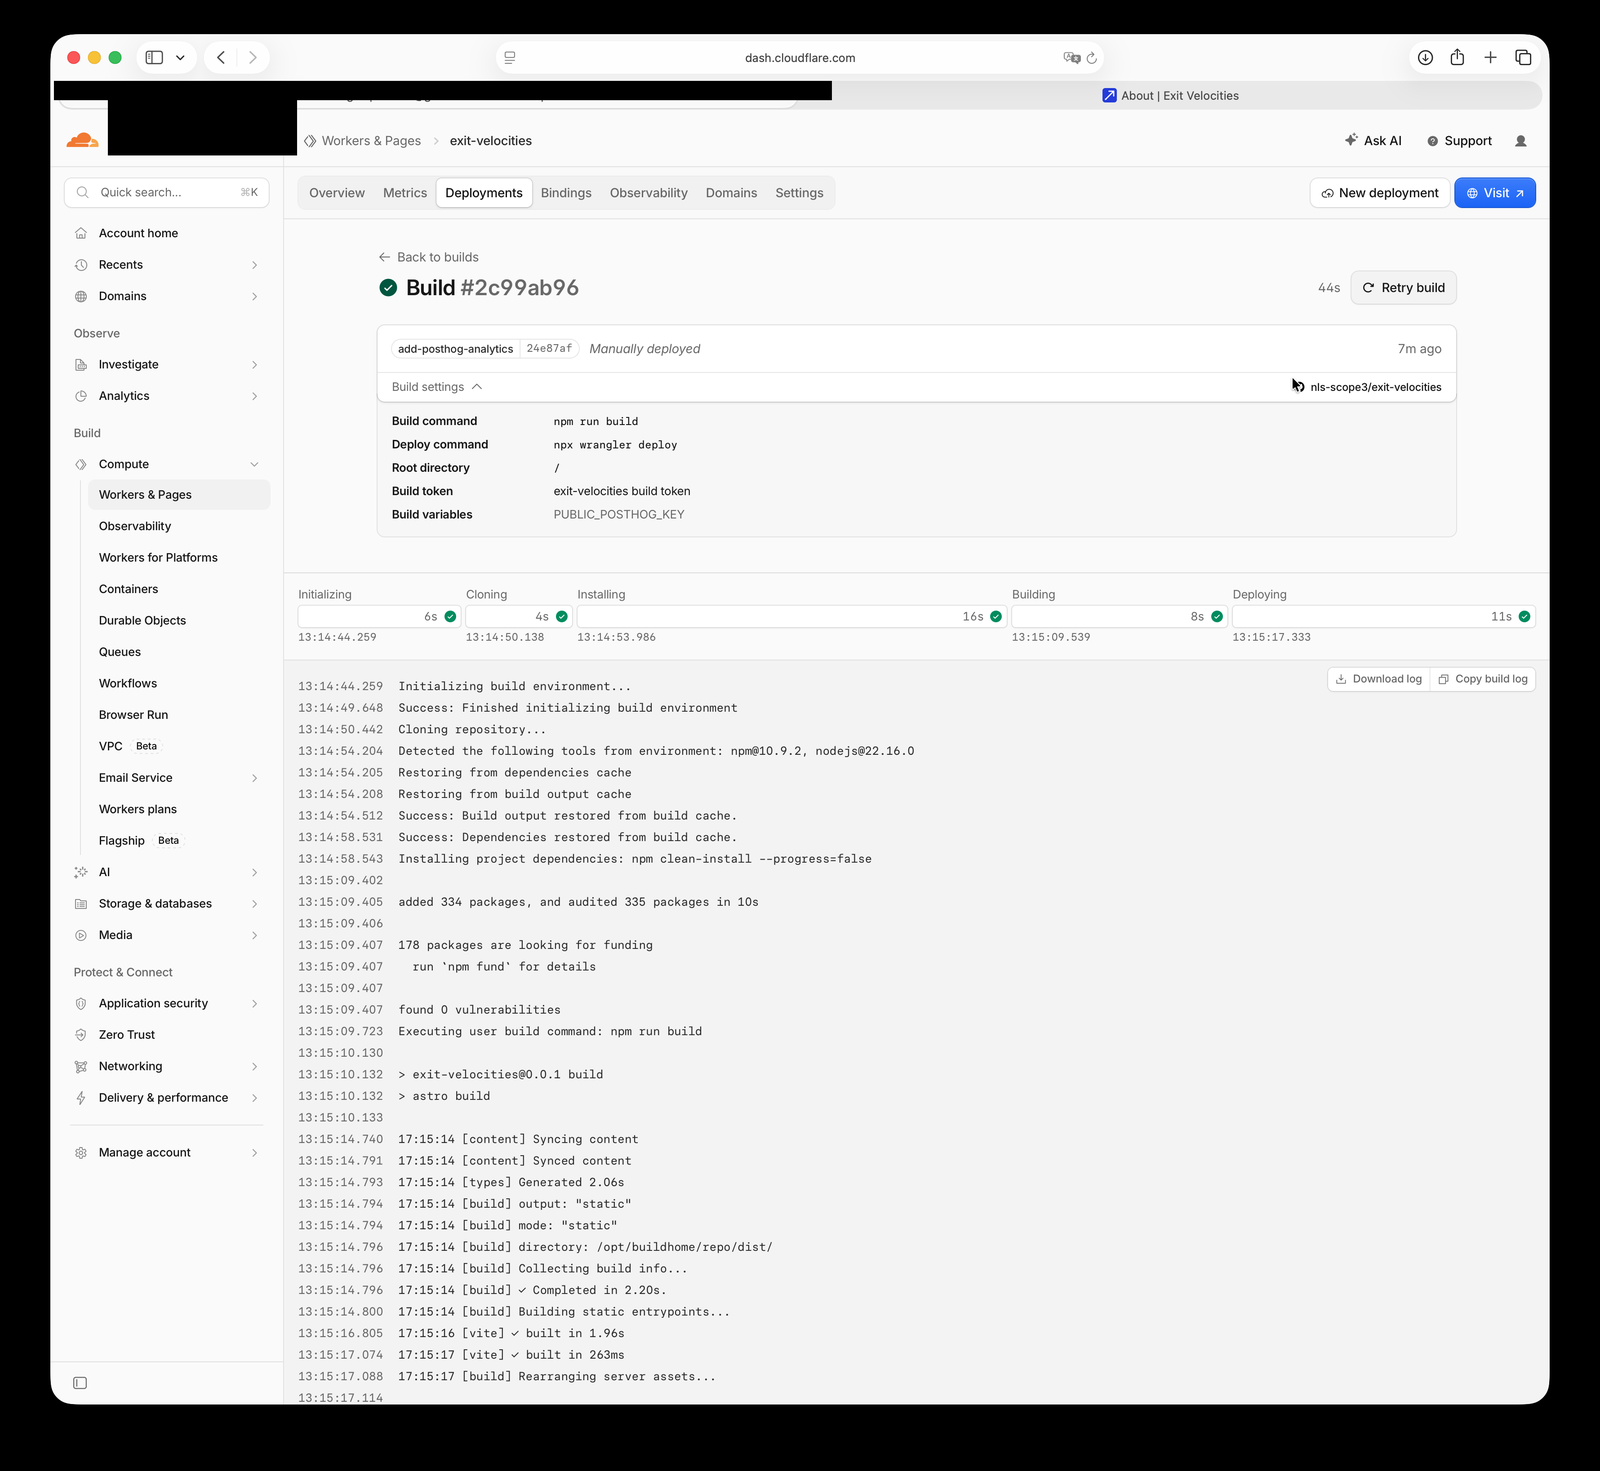
5. A fresh build picks it up#
Saving a new build variable doesn’t retroactively apply to a build that already ran. Cloudflare’s Retry build triggers a genuinely new one. This log shows the variable listed under Build variables, with every stage (Initializing, Cloning, Installing, Building, Deploying) completing green in well under a minute.
6. Confirm the domain isn’t routed somewhere else#
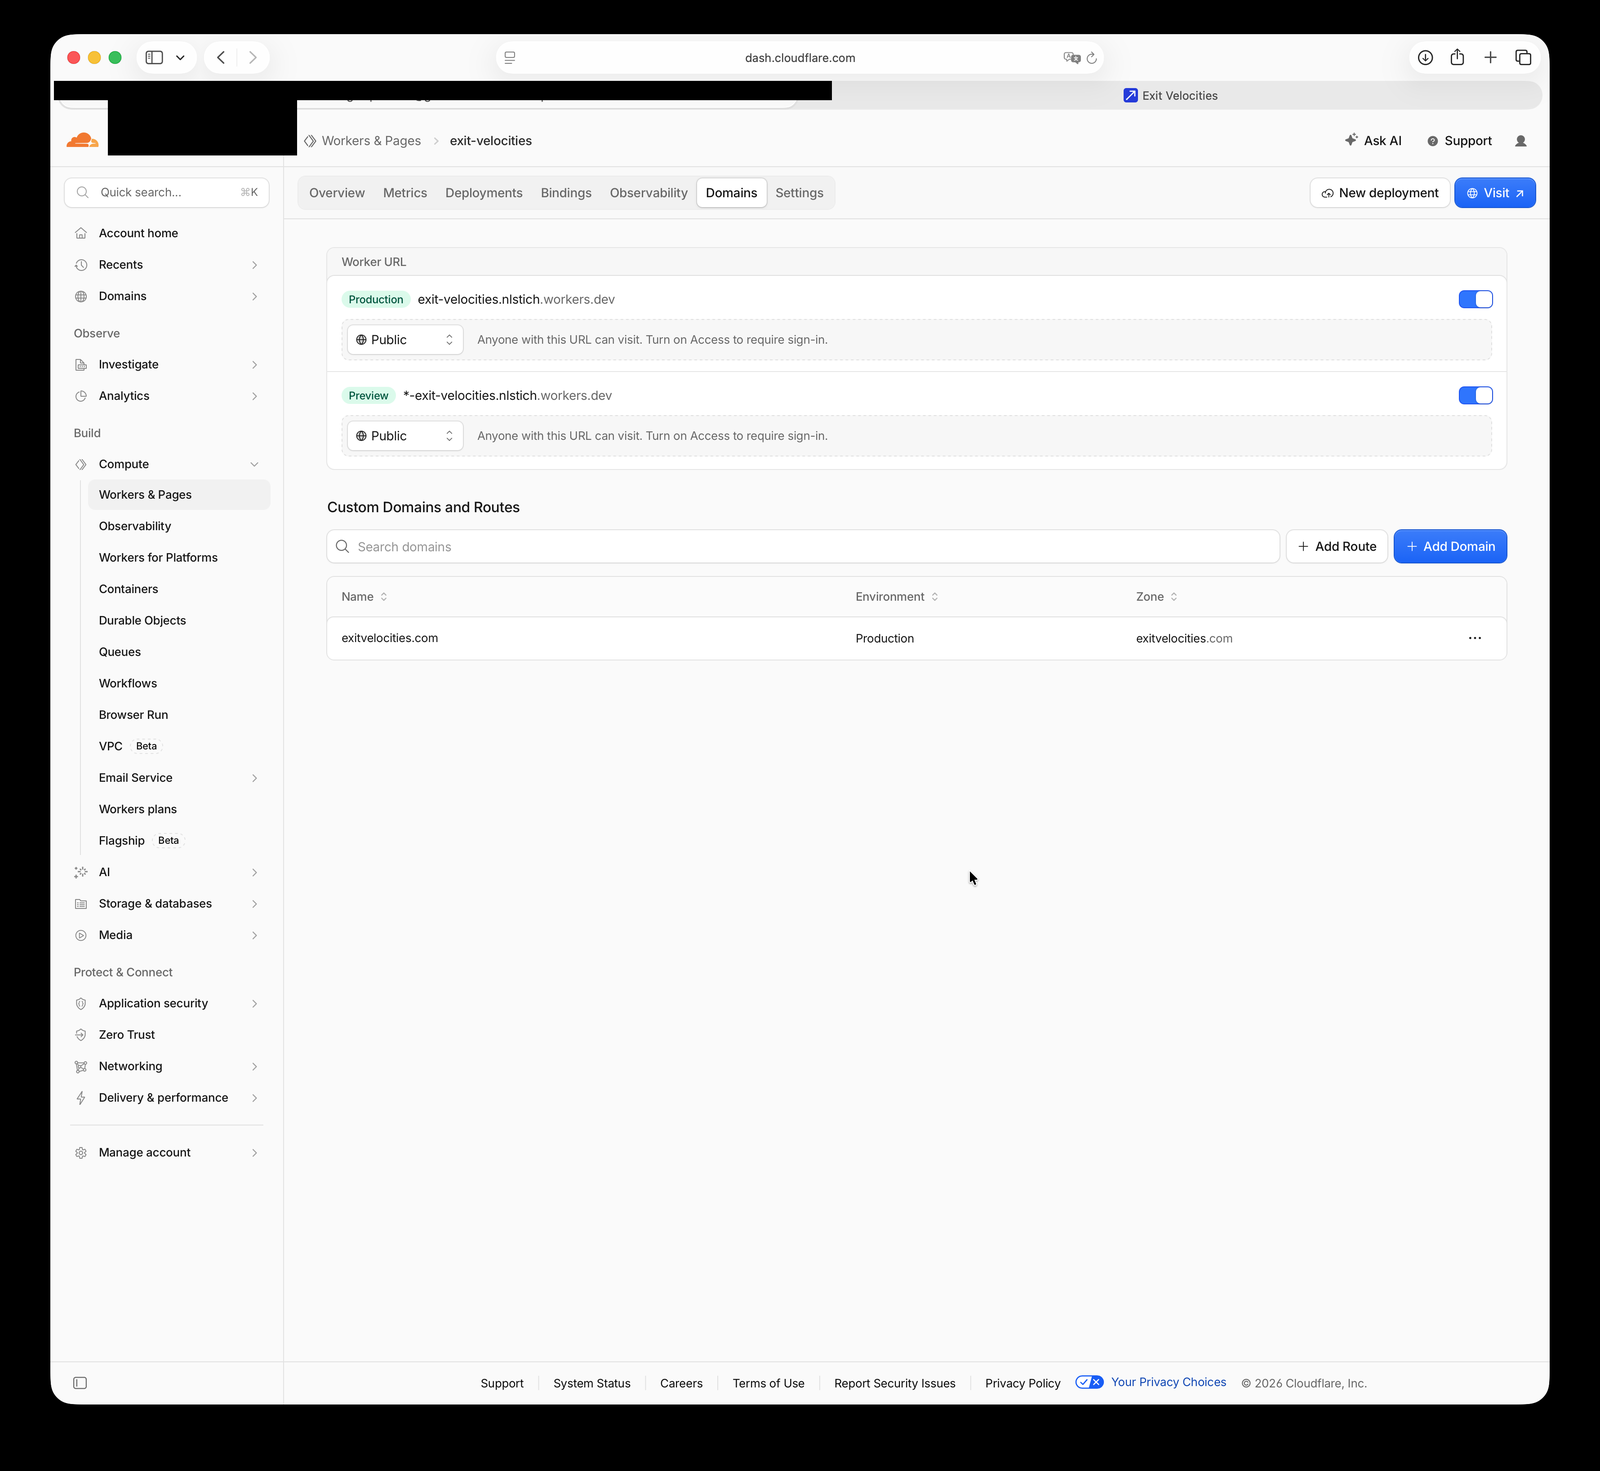
The second wrong turn: suspecting exitvelocities.com might be bound to a separate “preview”
environment that the branch builds weren’t reaching. The Worker’s Domains tab settled it:
exitvelocities.com is a Production-environment route on this same Worker, and the deploy command
is a bare npx wrangler deploy with no --env flag, so every successful build, from any branch,
goes live on the real domain immediately. Nothing was silently absorbing the deploys.
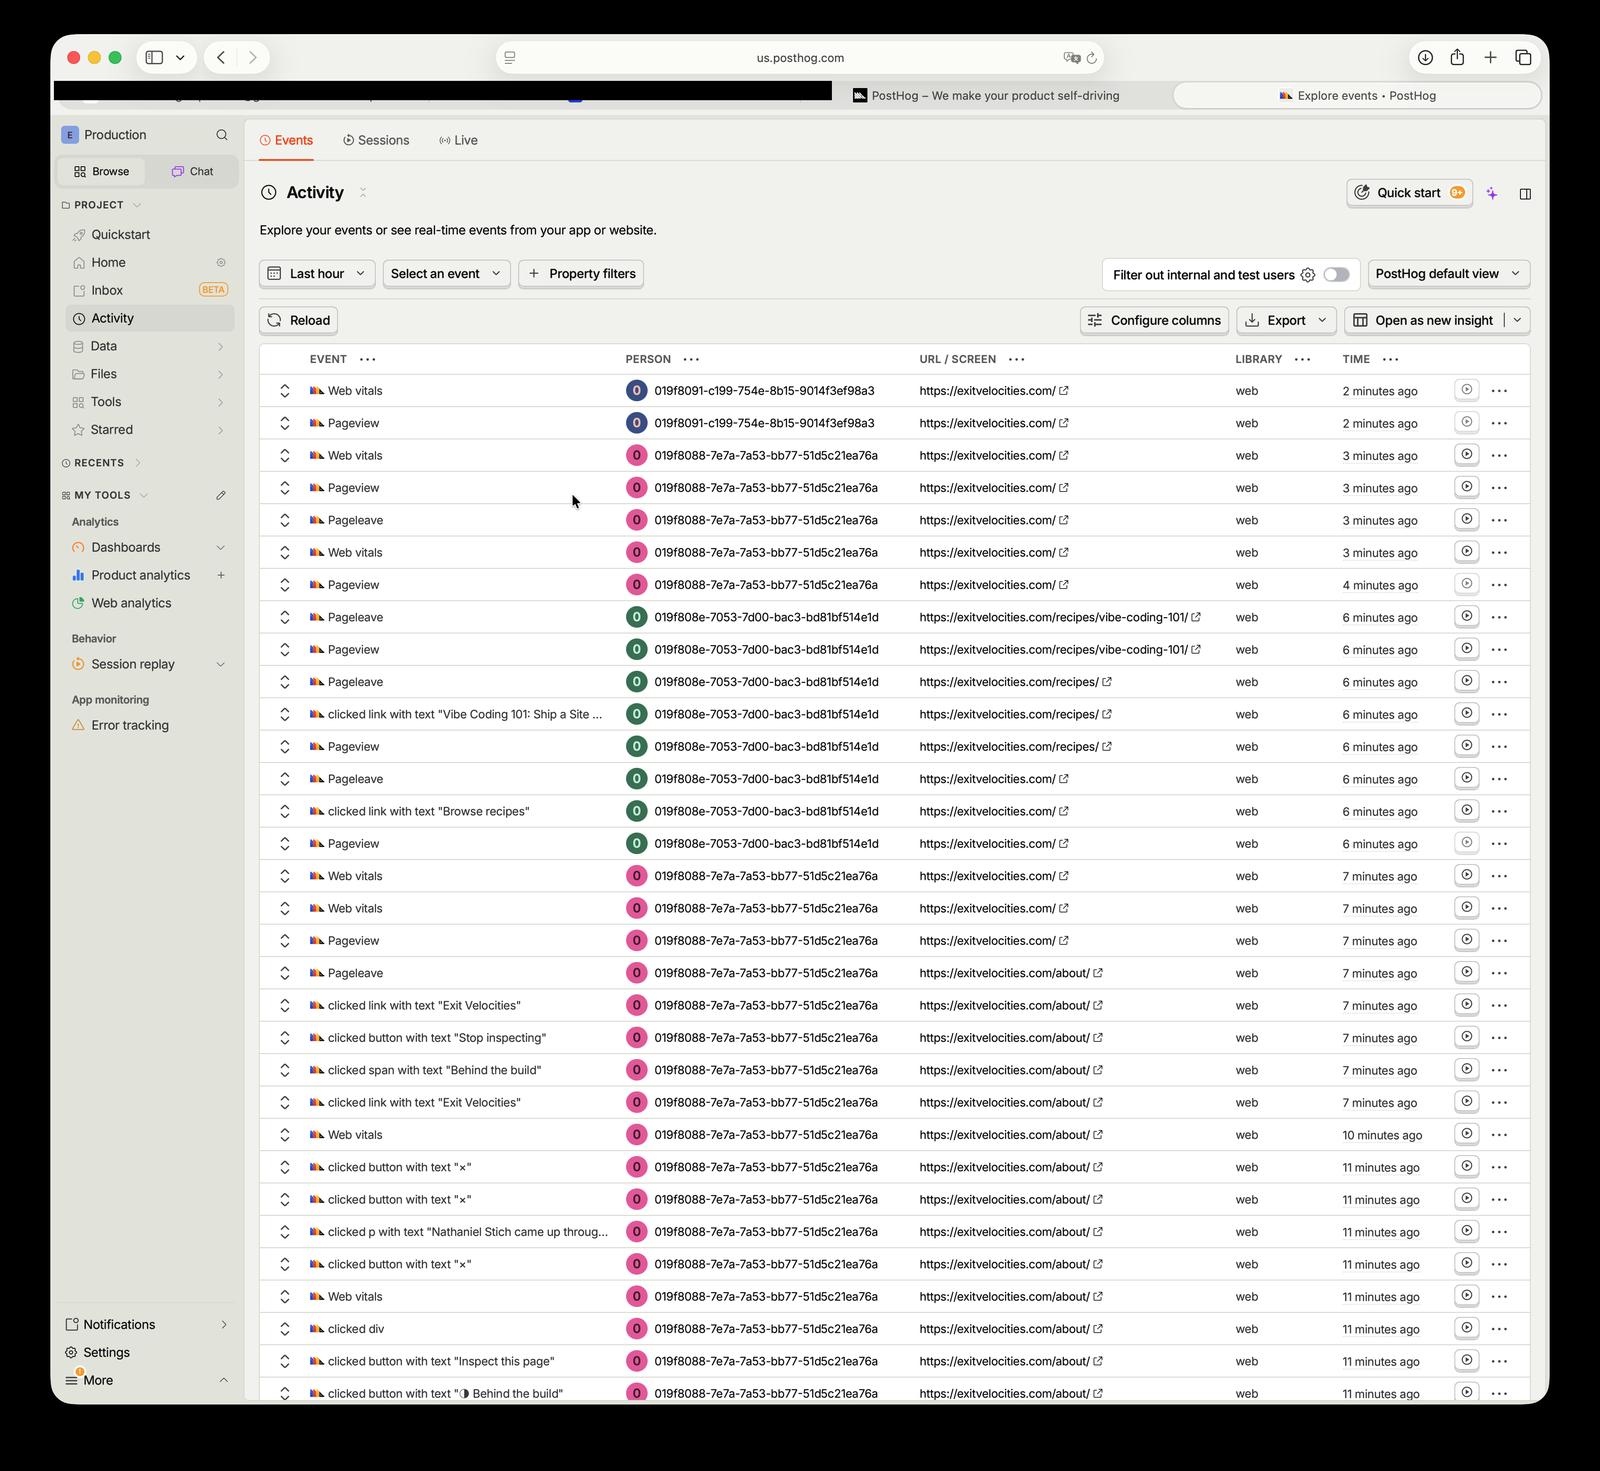
7. Real events, landing#
PostHog’s Activity view, showing real Pageview, Pageleave, and Web vitals events plus
autocaptured clicks (including ones from testing the site’s own “Behind the build” panel),
timestamped minutes after the retried build deployed.
Output#
That’s not a claim taken on faith. After wiring the tracking key into Cloudflare’s
build-time variables and triggering a fresh build, PostHog’s Activity view started showing real
Pageview, Pageleave, and Web vitals events, plus autocaptured clicks, from
exitvelocities.com. The pipeline in the Pattern above works end to end on the real domain, not
just locally.
Getting there took two wrong turns worth recording, since both looked plausible in the moment.
First, that Cloudflare’s edge cache was serving a stale copy (it wasn’t; a hard refresh and a
hand-copied page source from the browser confirmed the live HTML genuinely lacked the script).
Second, that saving the variable as an encrypted Secret rather than plaintext Text meant it never
reached the npm run build step (it didn’t matter; the Secret-type variable worked fine once a
fresh build ran). The real fix was simpler than either theory: a build variable doesn’t
retroactively apply to a build that already ran, and Cloudflare’s Retry build triggers a
genuinely new one.
Variations#
- Self-hosted or EU-cloud PostHog. An equivalent host variable, alongside your key variable, lets you override PostHog’s default US endpoint, so a self-hosted instance or PostHog’s EU cloud region both work without touching the init code.
- Server-side capture. The current setup is client-side only, so it’s subject to ad blockers like any other browser-based analytics. A server-side capture call would be more resilient, but it’s a separate step from getting a first, working traffic signal.
- Next in this line. The repo route pulls this data
into the repo on a schedule and renders it as a live dashboard at
/dashboard, without a server or a client-exposed read key. After that, once real traffic data accumulates, it becomes a missing input for the Growth & Marketing AI channel’s attribution work: the dynamic ICP model reasons about conversion and revenue by segment, but nothing on this site yet reasons about which channel a reader arrived from.