MCP + Claude Code
Vibe Coding 101: Ship a Site With Claude Code
Result:
A live, deployed Astro site you drove entirely through Claude Code — in an afternoon, whichever track you start from.
This is recipe #0 of a planned series documenting the build of this site itself, step by step. The rest of that series isn’t published yet.
Shortcut
Open Claude Code in an empty folder and paste this once the accounts below exist.
Requires manual input
A GitHub account, and, on Track B, a domain registered through Cloudflare plus the repo connected through Cloudflare’s “Import a Git repository” flow. Both happen inside a browser session tied to your own login; the numbered steps in whichever track matches your starting point below, or the screenshots in the walkthrough further down, cover where to click.
Scaffold a new Astro project with MDX support:

1. Run `npm create astro@latest` with the minimal template, and add the
   MDX and sitemap integrations.
2. Set up a `recipes` content collection (`src/content.config.ts`) with a
   Zod schema for title, description, pubDate, and a `pillar` enum.
3. Add a basic recipe layout and an index page listing every recipe.
4. Add a `wrangler.jsonc` at the repo root with `assets.directory` set to
   `./dist`, so Cloudflare's "Import a Git repository" flow (which
   provisions a Worker with static assets, not classic Pages) finds an
   entry point.
5. Initialize git, commit, and push to a new GitHub repository. Ask me
first whether it should be public or private.Problem#
“Vibe coding” — describing what you want in plain language and letting the model build it — only pays off if you can get from idea to deployed URL without stalling on setup. The blockers are never the code; they’re the plumbing: which framework, where it’s hosted, how the domain points at it, and how each change ships. This recipe removes those blockers so Claude Code does the building and you do the directing.
New to the vocabulary? See the glossary for terms like agent, context window, and MCP.
Two tracks#
Pick the track that matches where you’re starting. The middle — Claude Code driving an Astro project on GitHub — is identical for both. Only the endpoints differ: what you connect at the start, and how the domain gets attached at the end.
Track A — You already have a website#
You own a domain and it already resolves somewhere (Squarespace, WordPress, a landing page). You’re adding a fast, structured section you can grow — without touching the existing site until you’re ready to cut over.
- Install Node.js and Claude Code, then open Claude Code in an empty folder.
- Prompt it to scaffold an Astro + MDX project and push it to a new GitHub repo.
- Connect that repo to Cloudflare Workers (its “Import a Git repository” flow) for a free preview URL — nothing on your live domain changes yet.
- Build content by talking to Claude Code; every change is a commit with its own preview.
- When you’re happy, point a subdomain (e.g.
writing.yoursite.com) at Pages, or migrate the apex when you’re ready. Your old host keeps serving until you flip DNS.
Track B — From the ground up#
No domain, no host, nothing. You’ll register the domain and stand up the whole stack in one sitting.
- Register the domain at Cloudflare Registrar (at-cost, ~$10/yr) — this keeps domain, DNS, and hosting in one dashboard.
- Install Node.js and Claude Code; scaffold the Astro + MDX project the same way.
- Push to GitHub, connect Cloudflare Workers, and — because the domain lives in the same account — attach the custom domain with one click. HTTPS is automatic.
- Drive all content and layout through Claude Code from the first commit.
Track B, step by step — screenshots included, for anyone doing this for the first time
The four steps above are the whole shape of it. Here’s what each one looked like,
end to end, registering exitvelocities.com and standing up this very site.
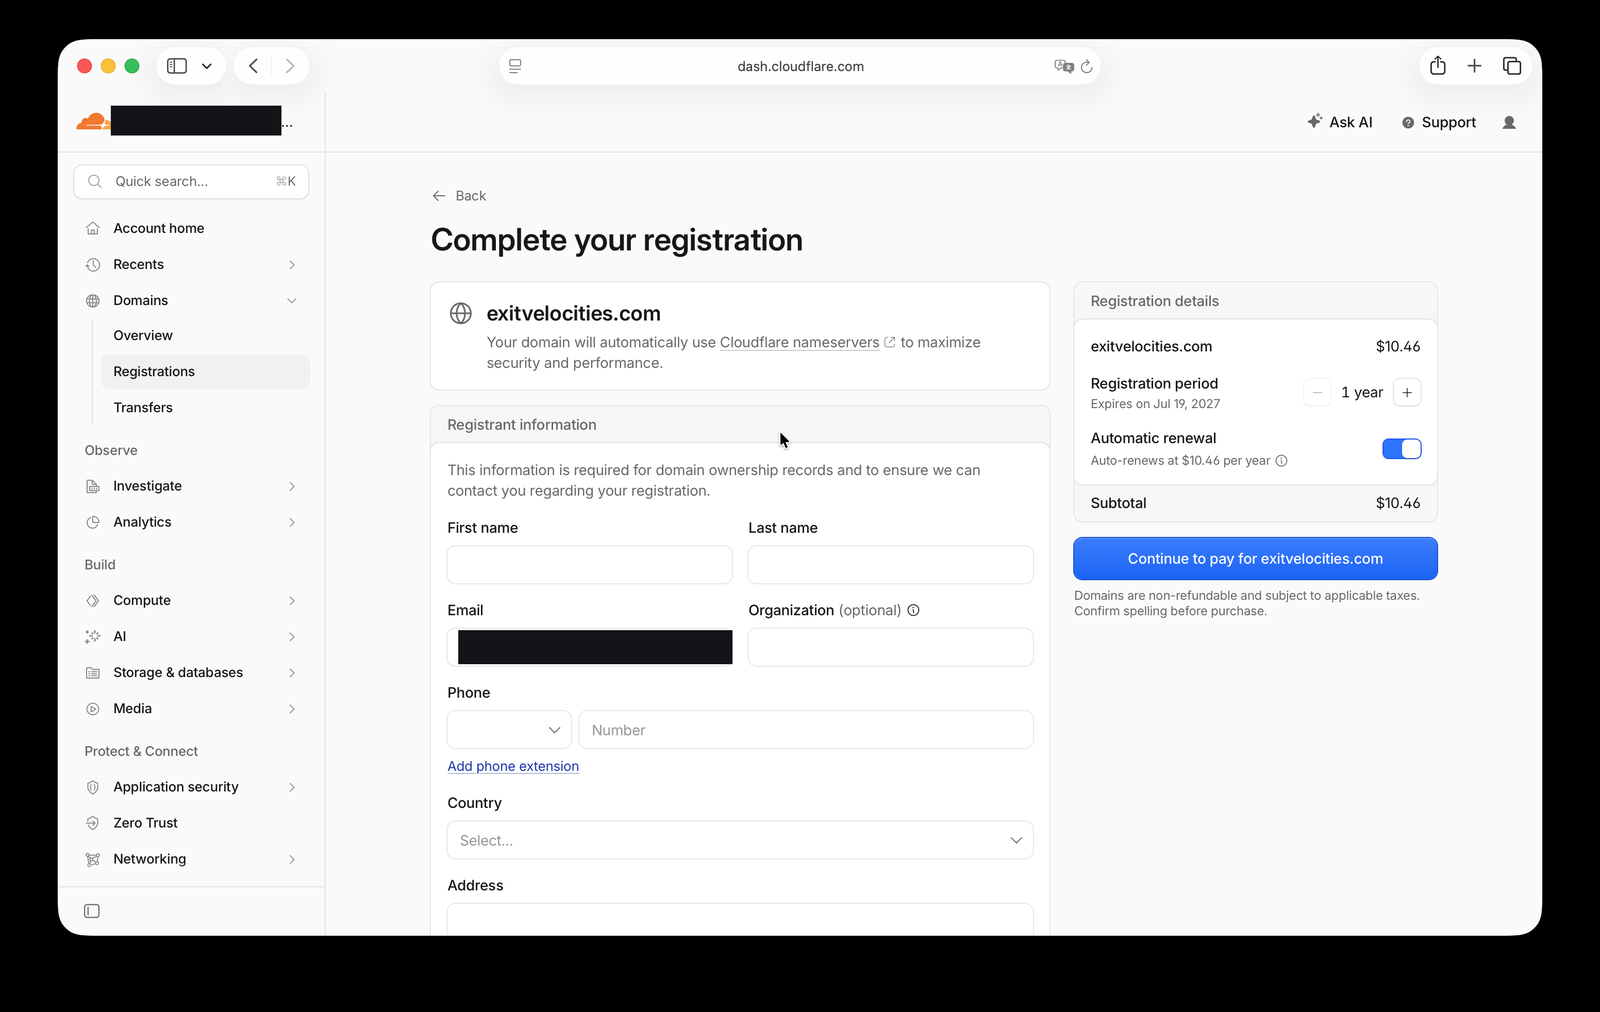
1. Register the domain#
Cloudflare Registrar sells at cost — no markup — so a .com runs close to wholesale (~$10.46/yr
here, auto-renewal on by default).
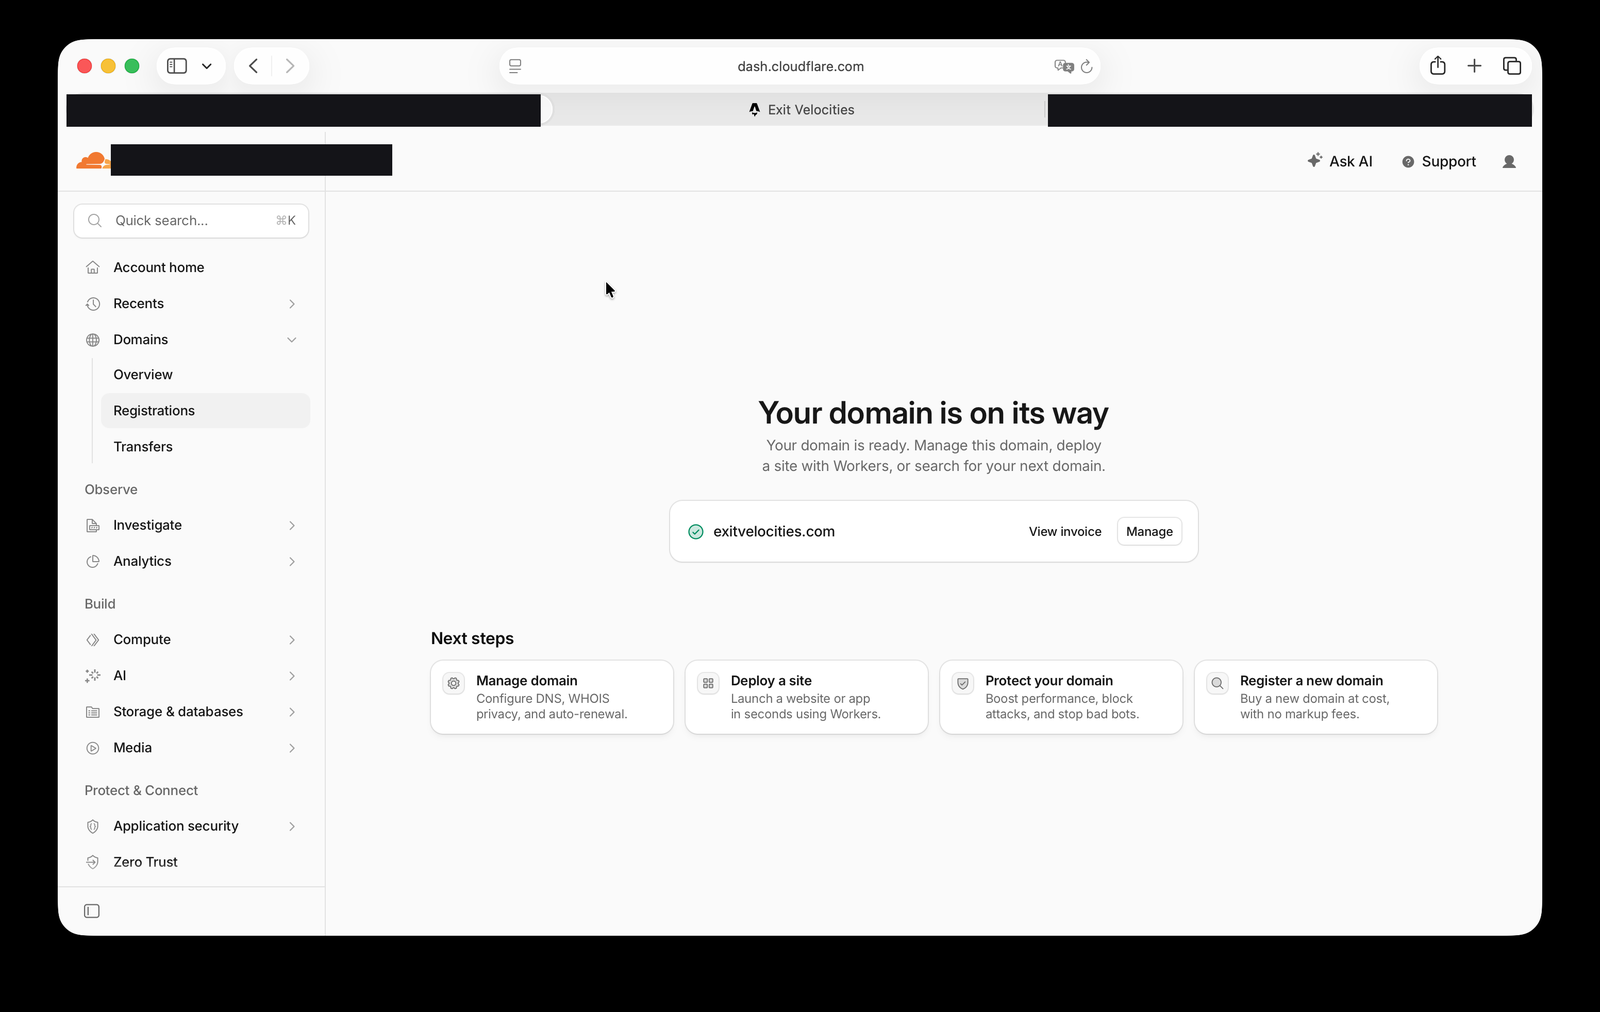
Registration clears in under a minute:
2. Connect the GitHub repo#
In Workers & Pages → Import a Git repository, pick the repo and set the build command. One
gotcha worth flagging: Cloudflare’s import flow now provisions a Worker with static assets by
default, not a classic Pages project — which means it needs a wrangler.jsonc in the repo root
({ "assets": { "directory": "./dist" } }) or the deploy step fails with no entry point found.
Claude Code added that file as part of this exact build, in its own PR, before retrying the deploy.
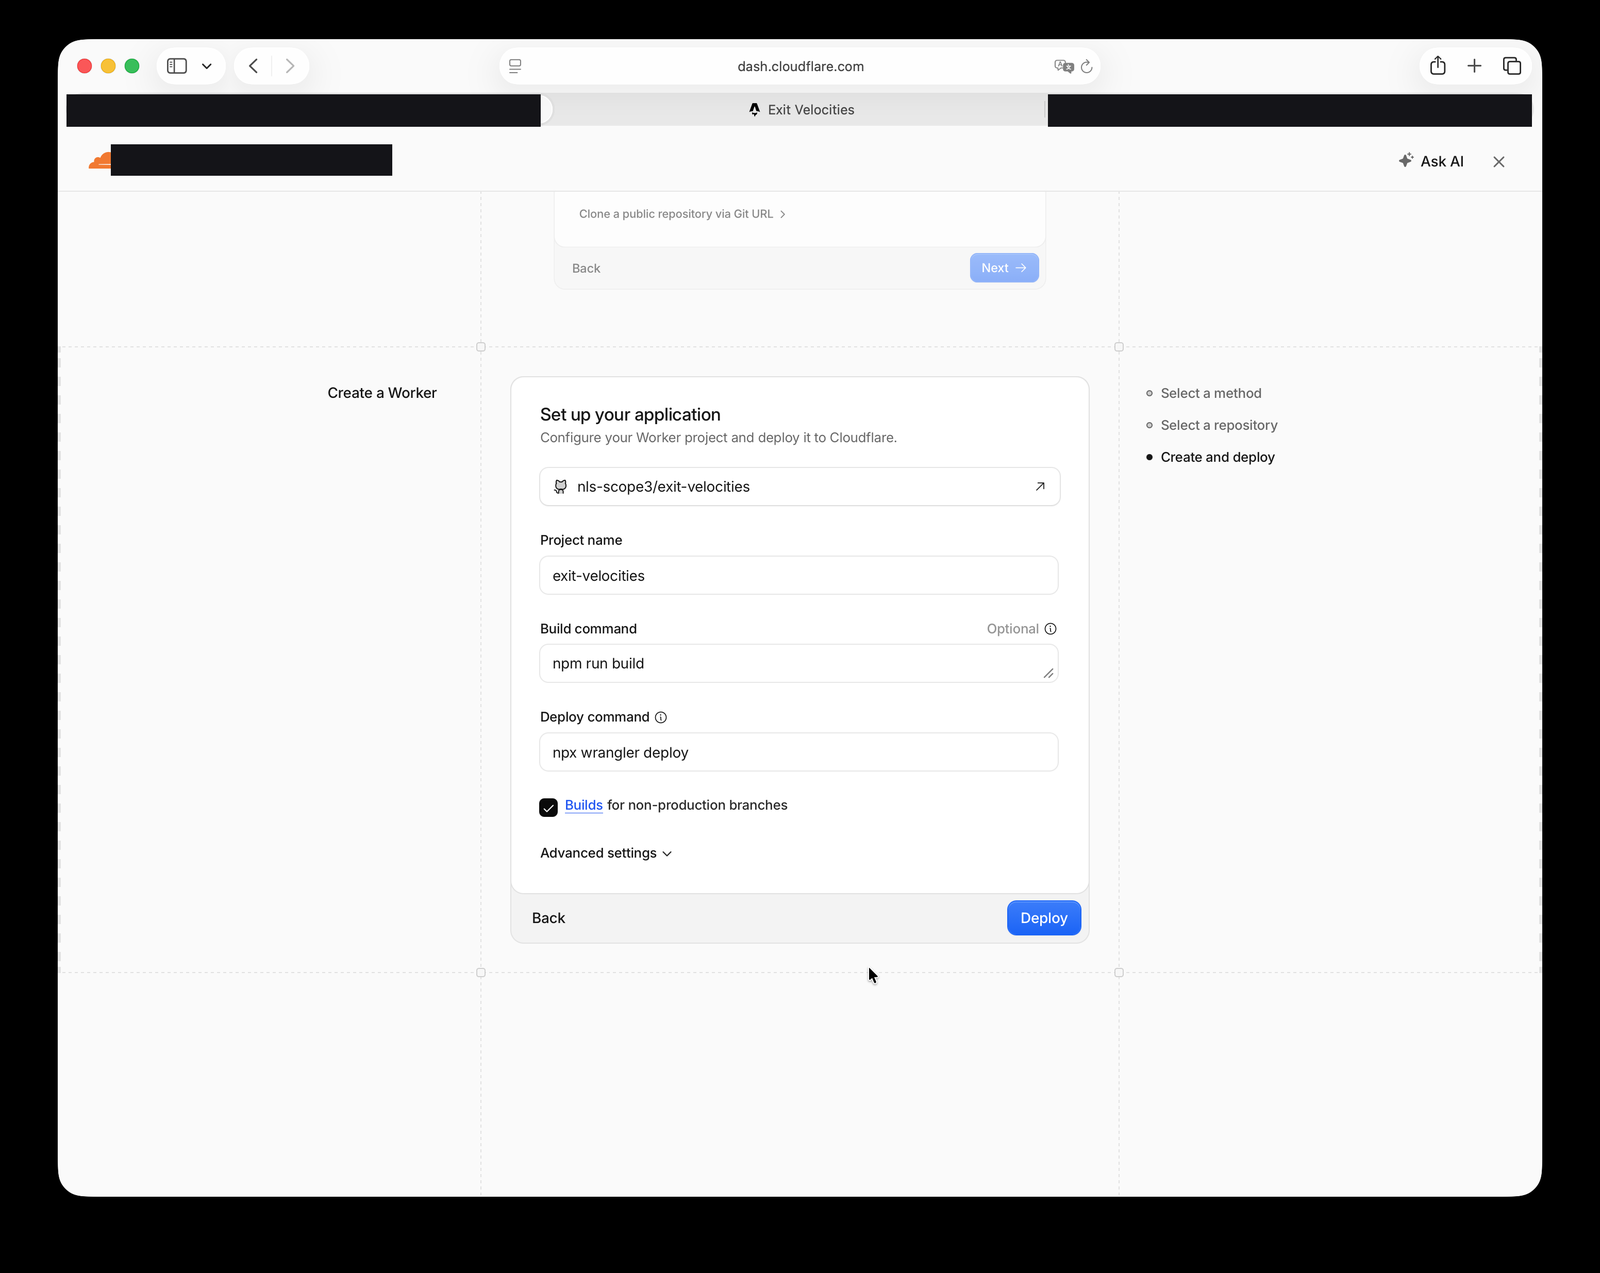
npm run build, deploy command npx wrangler deploy — Astro’s static output lands in dist/, which wrangler.jsonc points at.3. Confirm the build succeeded#
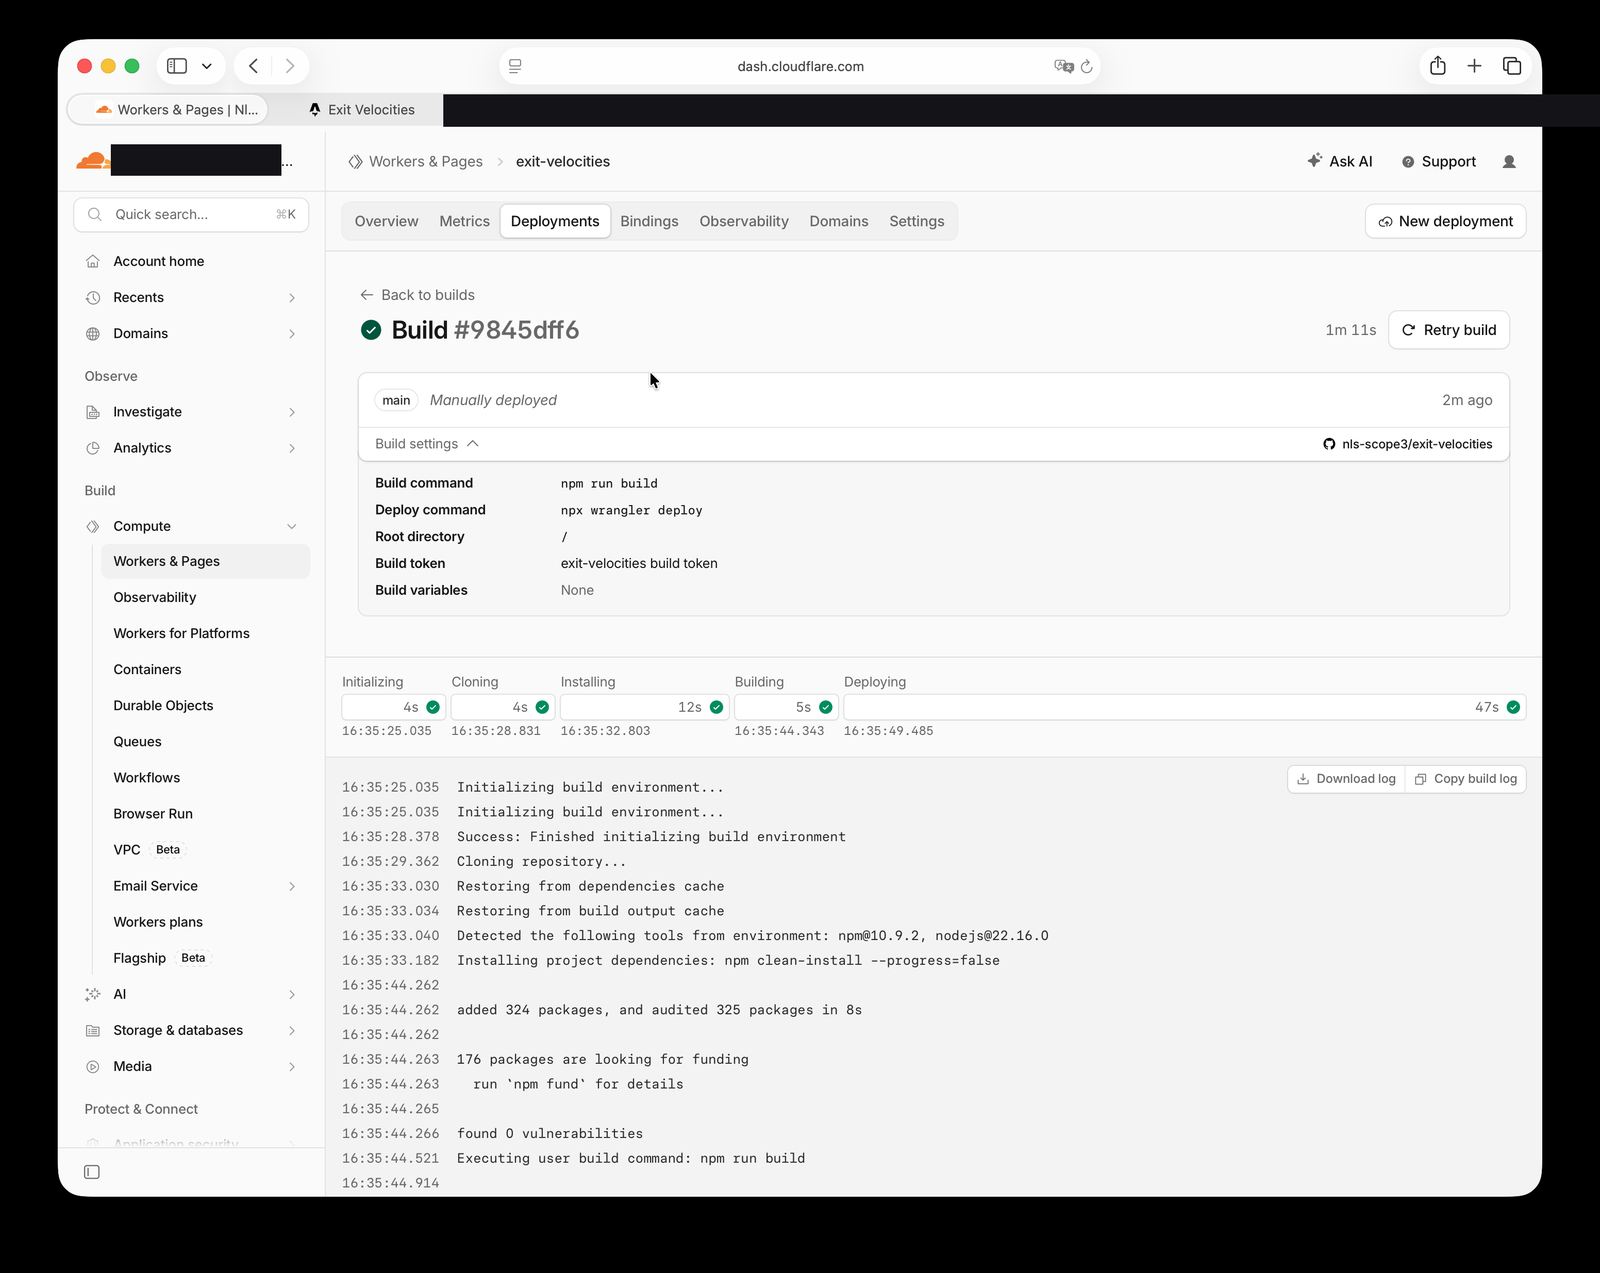
Every push re-runs this pipeline: clone → install → build → deploy. All green means the site is
live at its workers.dev URL, before the custom domain is even attached.
4. Attach the custom domain#
Two places to check, both in the Cloudflare dashboard. First, the domain itself shows Active under account-level Domains → Overview — that only confirms DNS is live, not that anything is connected to it yet:
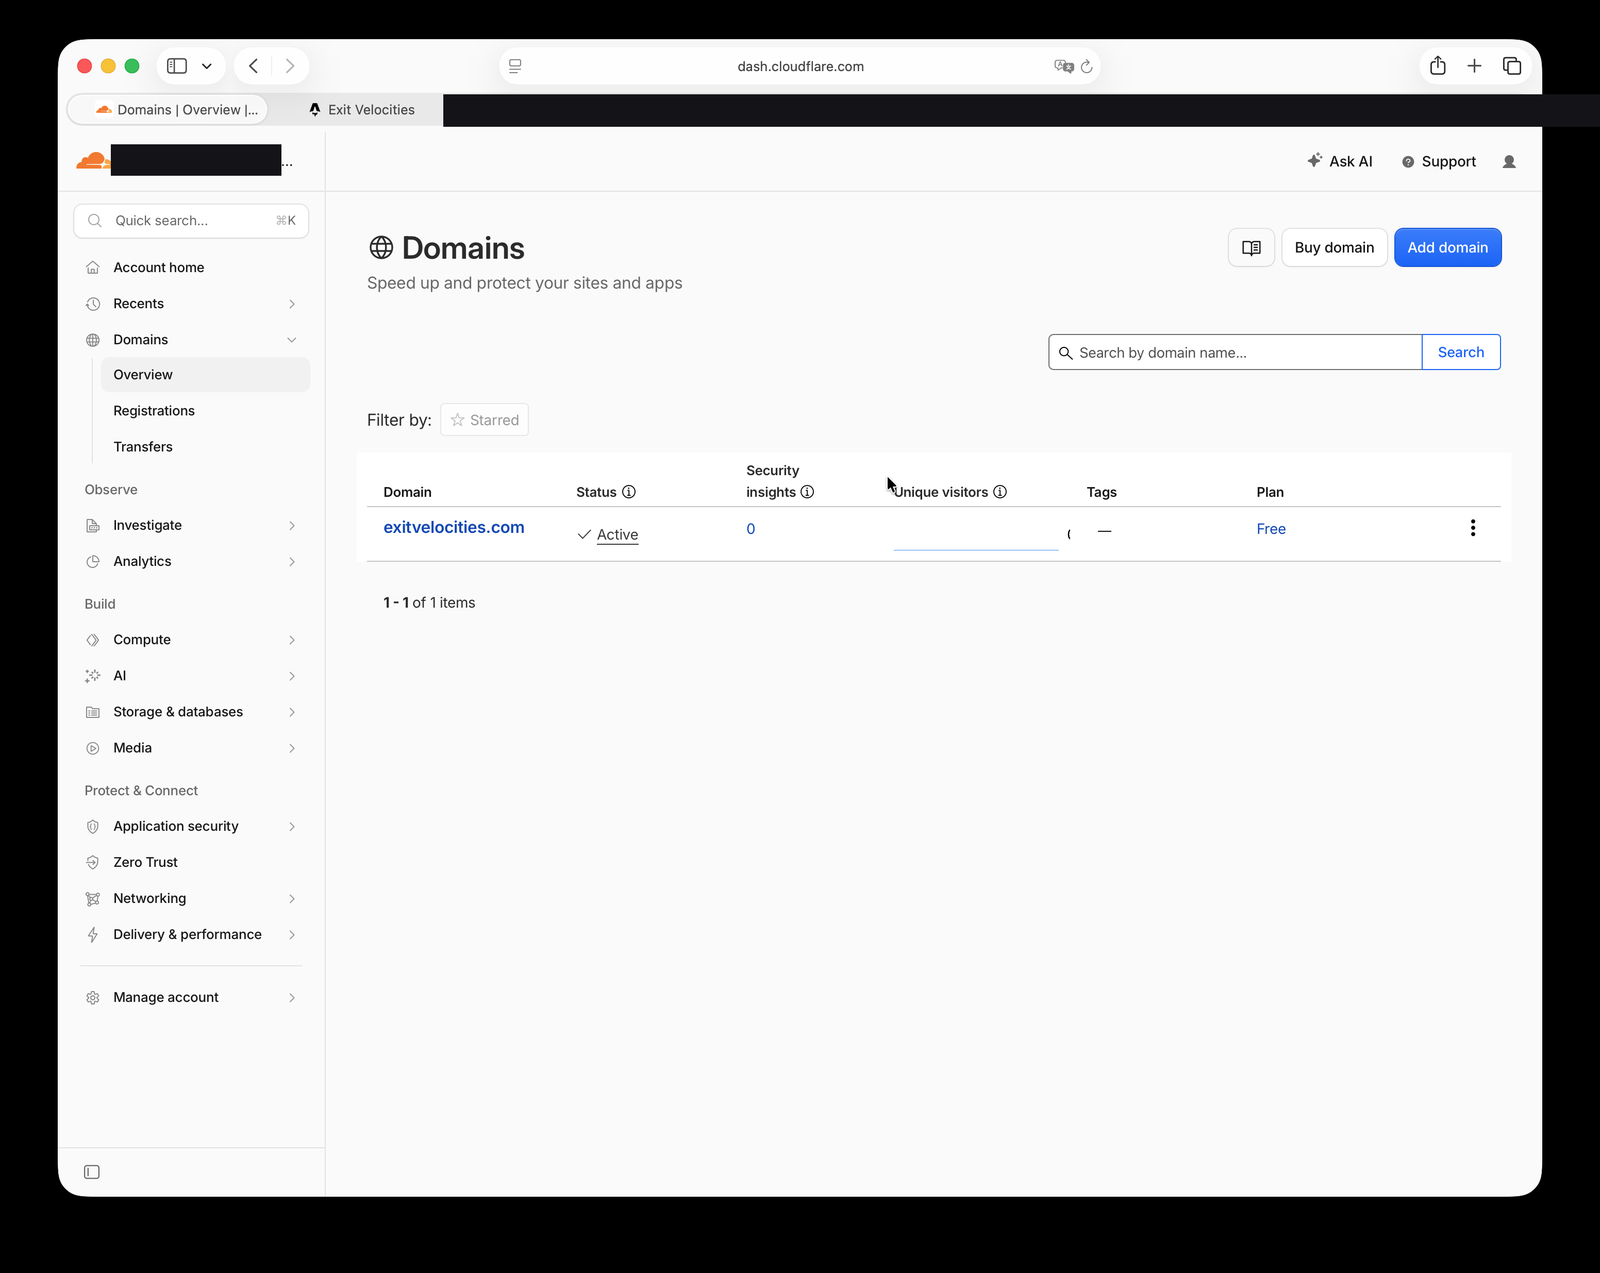
The step that matters happens on the Worker’s own Domains tab: Add Domain, type the domain, done. HTTPS is automatic because the domain and the Worker live in the same account.
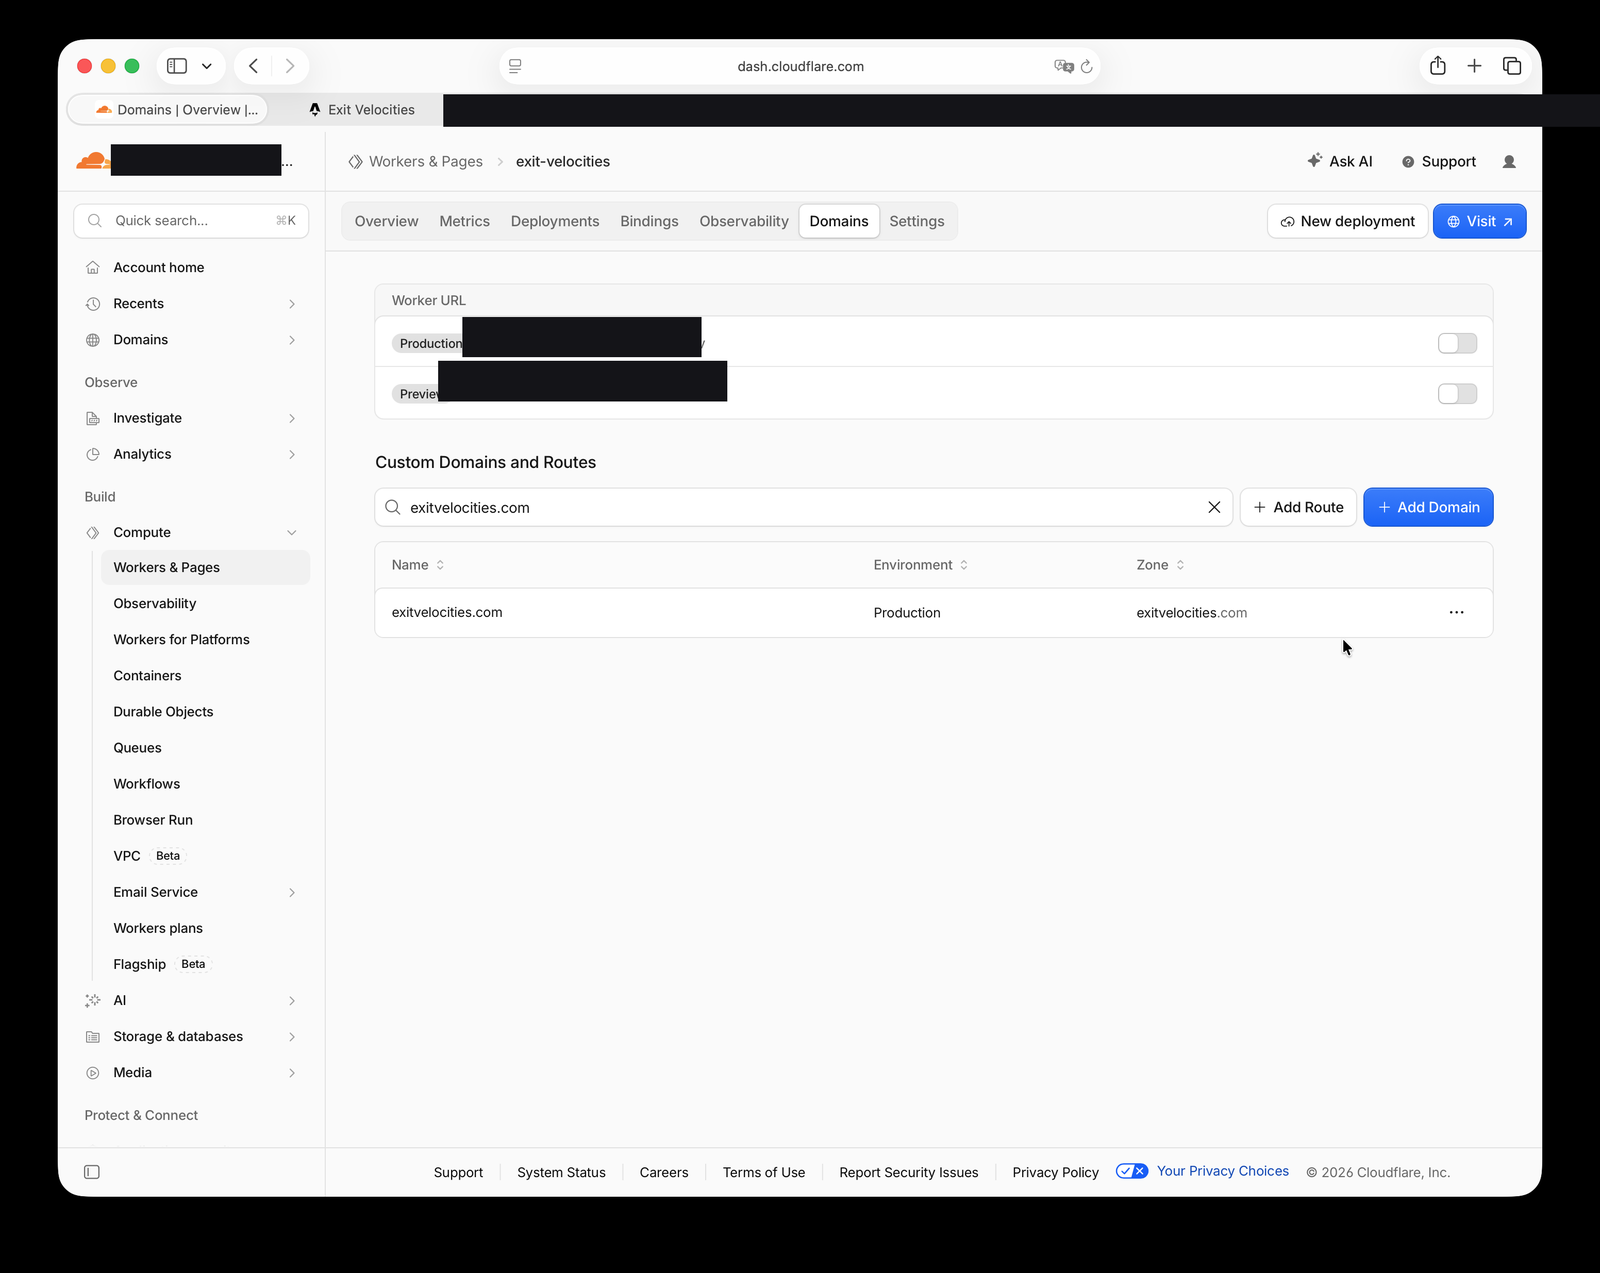
exitvelocities.com listed under Custom Domains and Routes, bound to Production — the domain is live.From here it’s the same loop as Track A: push to main, Cloudflare rebuilds and redeploys
automatically, and the live domain reflects it within a couple of minutes.
Output#
This very site is Track B, run end-to-end through Claude Code: domain registered at Cloudflare, Astro + MDX scaffolded, content collection schema written, deployed on Cloudflare Workers — for about $10/year all-in. The Tools used panel above this recipe is the exact bill of materials, each linked to where you sign up.
The same tools can also produce the opposite of this. /vibe-check is a field
guide to what “vibe coding” looks like without direction — a landing page built entirely from
AI-slop tells, with a toggle that names each one.
Variations#
- Swap Cloudflare Workers for Vercel or Netlify (both free tiers) — the Astro output is identical, so only the “connect the repo” step changes.
- On Track A, if your existing site is also on GitHub, skip the new repo and have Claude Code add the Astro project as a subdirectory or subdomain instead.
- Already on a Claude Pro plan? Claude Code is included — the only new spend on Track B is the domain.